zabbix server的高可用解决方案
很久之前写的,再回首发现有很多地方可以改善,只是现在懒得动手了!
本文不适合zabbix初学者
实验环境
[root@agent ~]# cat /etc/redhat-release
CentOS release 6.7 (Final)
[root@agent ~]# sestatus
SELinux status: disabled
[root@agent ~]# /etc/init.d/iptables stop
ssh优化
GSSAPIAuthentication no
UseDNS no
本次实验一共准备了,三台机器
|
主机名 |
ip |
软件环境 |
|
zabbix-server01 |
192.168.56.29 |
httpd+php+keepalived+sshpass zabbix server+agent |
|
zabbix-server02 |
192.168.56.30 |
httpd+php+keepalived+sshpass zabbix server+agent |
|
agent |
192.168.56.99 |
zabbix agent+mysql |
VIP规划:192.168.56.66
本文中用到了sshpass免密钥交互,也可以做ssh相互免密钥登录
zabbix server的高可用,我试过在agent配置文件中,使用VIP,发现不能正常监控,于是才有本文。
我的做法agent中的配置文件,Server和ServerActive中分别都配置了两个ip,就是为了保证,zabbix-server01宕机了,还可以把监控数据发往zabbix-server02,由于两个zabbix-server共用一个数据库,肯定不能同时往数据库写数据,于是我想到了使用keepalived来控制zabbix server的开关,做到VIP在哪,那台机器的zabbix server就启动,另外一台关闭,而zabbix的web页面使用VIP去访问
本文把zabbix数据库独立出来,为了方便做mysql高可用集群
首先在zabbix-server01
rpm -ivh http://mirrors.aliyun.com/zabbix/zabbix/3.0/rhel/6/x86_64/zabbix-release-3.0-1.el6.noarch.rpm
vim /etc/yum.repos.d/zabbix.repo
修改两处bashurl
baseurl=http://mirrors.aliyun.com/zabbix/zabbix/3.0/rhel/6/x86_64/
baseurl=http://mirrors.aliyun.com/zabbix/non-supported/rhel/6/x86_64/
因为zabbix3.0需要php5.4以上,这里安装一个php的yum源
rpm -ivh http://mirror.webtatic.com/yum/el6/latest.rpm
安装httpd和php
yum install httpd -y
yum install php55w php55w-mysql php55w-common php55w-gd php55w-mbstring php55w-mcrypt php55w-devel php55w-xml php55w-bcmath -y
安装zabbix
yum install -y zabbix-agent.x86_64 zabbix-get.x86_64 zabbix-server-mysql.x86_64 zabbix-web.noarch zabbix-web-mysql.noarch
\cp -R /usr/share/zabbix/ /var/www/html/
sed -i 's#^post_max_size = 8M#post_max_size = 16M#g' /etc/php.ini
sed -i 's#^max_execution_time = 30#max_execution_time = 300#g' /etc/php.ini
sed -i 's#^max_input_time = 60#max_input_time = 300#g' /etc/php.ini
sed -i '883a date.timezone = Asia/shanghai' /etc/php.ini
sed -i '276a ServerName 127.0.0.1:80' /etc/httpd/conf/httpd.conf
scp /usr/share/doc/zabbix-server-mysql-3.0.5/create.sql.gz root@192.168.56.99:/opt
在agent上
yum install -y zabbix-agent.x86_64
yum install -y mysql-server mysql-devel mysql
/etc/init.d/mysqld start
mysql -e "create database zabbix character set utf8 collate utf8_bin;"
mysql -e "show databases;"
mysql -e "grant all on zabbix.* to zabbix@'192.168.56.%' identified by '123456';"
mysql -e "select user,host from mysql.user"
zcat /opt/create.sql.gz |mysql -uzabbix -p123456 zabbix
在zabbix-server01上
sed -i '81a DBHost=192.168.56.99' /etc/zabbix/zabbix_server.conf
sed -i '116a DBPassword=123456' /etc/zabbix/zabbix_server.conf
/etc/init.d/httpd start
/etc/init.d/zabbix-server start
/etc/init.d/zabbix-agent start
打开浏览器进行安装
安装完成后
scp /etc/zabbix/web/zabbix.conf.php root@192.168.56.30:/opt
在zabbix-server02
rpm -ivh http://mirrors.aliyun.com/zabbix/zabbix/3.0/rhel/6/x86_64/zabbix-release-3.0-1.el6.noarch.rpm
vim /etc/yum.repos.d/zabbix.repo
修改两处bashurl
baseurl=http://mirrors.aliyun.com/zabbix/zabbix/3.0/rhel/6/x86_64/
baseurl=http://mirrors.aliyun.com/zabbix/non-supported/rhel/6/x86_64/
rpm -ivh http://mirror.webtatic.com/yum/el6/latest.rpm
安装httpd和php
yum install httpd -y
yum install php55w php55w-mysql php55w-common php55w-gd php55w-mbstring php55w-mcrypt php55w-devel php55w-xml php55w-bcmath -y
安装zabbix
yum install -y zabbix-agent.x86_64 zabbix-get.x86_64 zabbix-server-mysql.x86_64 zabbix-web.noarch zabbix-web-mysql.noarch
\cp -R /usr/share/zabbix/ /var/www/html/
sed -i 's#^post_max_size = 8M#post_max_size = 16M#g' /etc/php.ini
sed -i 's#^max_execution_time = 30#max_execution_time = 300#g' /etc/php.ini
sed -i 's#^max_input_time = 60#max_input_time = 300#g' /etc/php.ini
sed -i '883a date.timezone = Asia/shanghai' /etc/php.ini
sed -i '276a ServerName 127.0.0.1:80' /etc/httpd/conf/httpd.conf
sed -i '81a DBHost=192.168.56.99' /etc/zabbix/zabbix_server.conf
sed -i '116a DBPassword=123456' /etc/zabbix/zabbix_server.conf
\mv /opt/zabbix.conf.php /etc/zabbix/web/
/etc/init.d/httpd start
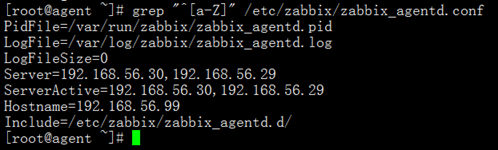
vi /etc/zabbix/zabbix_agentd.conf
修改如下三处:
Server=192.168.56.30,192.168.56.29
ServerActive=192.168.56.30,192.168.56.29
Hostname=192.168.56.99
修改完成如下
/etc/init.d/zabbix-agent start
在zabbix-server01和zabbix-server02上分别安装keepalived的
zabbix-server01
配置文件如下
cat /etc/keepalived/keepalived.conf
! Configuration File for keepalived
global_defs {
router_id LVS_DEVEL 29
}
vrrp_instance VI_1 {
state BACKUP
interface eth0
virtual_router_id 51
priority 150
advert_int 1
authentication {
auth_type PASS
auth_pass 1111
}
virtual_ipaddress {
192.168.56.66
}
notify_master /opt/to_master.sh
}
cat /opt/to_master.sh
#!/bin/bash
sshpass -p 123456 ssh -o StrictHostKeyChecking=no root@192.168.56.30 "/etc/init.d/zabbix-server stop"
/etc/init.d/zabbix-server start
zabbix-server02
配置文件如下
cat /etc/keepalived/keepalived.conf
! Configuration File for keepalived
global_defs {
router_id LVS_DEVEL 30
}
vrrp_instance VI_1 {
state BACKUP
interface eth0
virtual_router_id 51
priority 100
advert_int 1
authentication {
auth_type PASS
auth_pass 1111
}
virtual_ipaddress {
192.168.56.66
}
notify_master /opt/to_master.sh
}
[root@zabbix3 zabbix]# cat /opt/to_master.sh
#!/bin/bash
sshpass -p 123456 ssh -o StrictHostKeyChecking=no root@192.168.56.29 "/etc/init.d/zabbix-server stop"
/etc/init.d/zabbix-server start
下面是测试
两台zabbix server都启动keepalived的
zabbix-server01 启动zabbix server
zabbix-server02不启动zabbix server
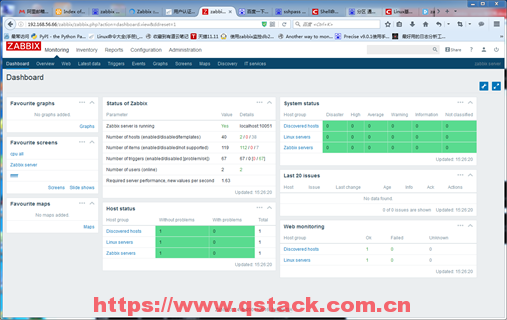
zabbix-server01状态如下

zabbix-server02状态如下

模拟zabbix-server01宕机,keepalived不工作了


再测试飘回来


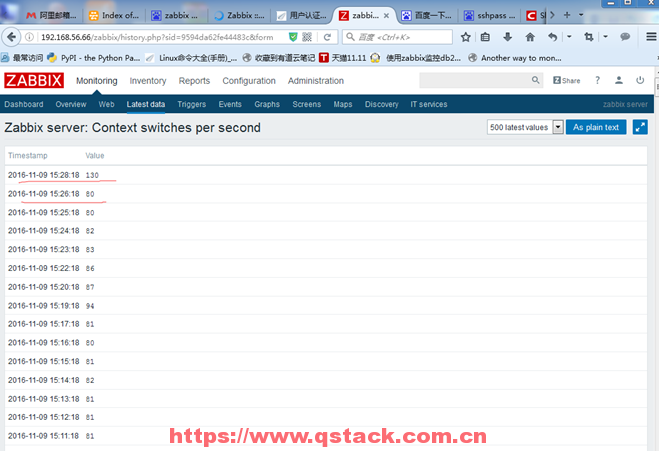
查看数据历史间隔,发现会丢失个别监控项的一次监控数据
由于两台zabbix-server只会同时开启一台,所有agent的日志如下

期待你有更好的方法!


评论已关闭